

All Categories
How to Dismantle a Bunk Bed?
A bunk bed is dismantled by taking out the bedding and mattresses, removing guardrails, detaching the ladder, separating the top bunk, and unfastening the frame.
Enjoy FREE Delivery on All Orders!
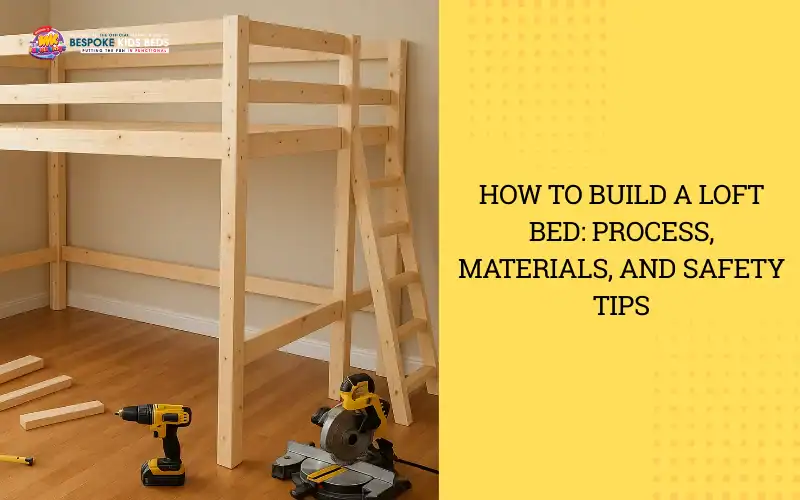
To build a loft bed, you need to measure the available space, choose durable materials like 2×4 pine and plywood, use essential tools such as a mitre saw and power drill, and follow a well-structured, safe construction process from start to finish.
Loft beds are an effePositioned to make use of two adjacent walls, the corner loft bed is perfect for maximising awkward or underused corners in a room. By forming an L-shaped structure, this variant offers enhanced stability and practical layout opportunities. Built-in shelving or a desk can easily be added to the interior angle, making it ideal for compact bedrooms where preserving central floor space is essential.ctive way to maximise usable floor space, especially in small bedrooms, studio flats, or children’s rooms. By raising the sleeping area, they create functional zones underneath, ideal for workstations, storage, or play areas, without expanding the room’s footprint. This makes them particularly valuable for families looking to balance practicality with a sense of style.
This guide offers a complete walkthrough of the loft bed construction process. It begins with planning and material selection, then moves through cutting, assembly, and finishing steps, concluding with safety checks and optional upgrades. Whether you are a seasoned DIY builder or a first-time builder, the instructions are designed to help you create a loft bed that is structurally sound, child-safe, and customised to your space and budget.
You will need structural lumber, cutting and measuring tools, joinery hardware, and optional finishing items to build a loft bed. Start with 2×4 or 2×6 boards suitable for framing, then gather essential tools like a mitre saw, drill, and clamps to ensure accurate cuts and stable assembly. Include screws, brackets, and wood glue to create secure joints that support weight and movement. For added functionality or style, consider extras such as LED lighting or child-safe finishes. Preparing all materials in advance helps maintain a steady workflow and promotes a safe, organised building environment.
The wood you choose plays a direct role in how strong, safe, and long-lasting your loft bed will be. It is important to match each type of wood to its proper function, whether it is for the frame, base, or additional features. Below are the most suitable wood types, along with their intended uses:
Using the correct tools helps ensure clean cuts, strong joints, and safe assembly throughout the build. A basic set of quality tools covers all essential tasks, from measuring and marking to cutting and fastening. Make sure to gather and test these before starting:
Durability and load capacity rely heavily on the fasteners used in your loft bed build. Each component needs the right type of hardware to maintain structural integrity. Use the following items for secure and lasting construction:
Optional enhancements allow you to customise the loft bed for added style, comfort, or functionality. These extras are especially useful in shared spaces or children’s rooms. Consider incorporating some of the following upgrades:
The step-by-step process to construct a loft bed involves measuring the room, selecting the right wood, cutting and prepping parts, assembling the frame, installing guardrails and access features, anchoring the structure, and finishing with paint and safety checks. This process is broken into 13 clear steps that cover everything from planning and cutting to final safety checks. Follow the sequence carefully to ensure a secure and well-built loft bed that meets functional and safety standards.
Getting accurate room measurements is the first step to ensuring your loft bed fits safely and comfortably. This helps you avoid clearance problems with ceilings, obstructions like windows or vents, and ensures there is space for ladders or access zones. Focus on the following key measurements:
Once your layout is confirmed, selecting the correct wood ensures the bed is structurally sound and aligned with your budget. Use different wood grades and species based on each part’s load requirement and visibility. Below are suitable options:
Cutting all lumber to precise lengths keeps assembly smooth and aligned. This step also reduces waste and makes later stages more efficient. Use this checklist when cutting:
Pre-drilling pocket holes improves strength and makes assembly faster. Joinery preparation should happen before frame assembly to avoid delays or misalignment. Follow these steps:
The outer frame determines the bed’s footprint and provides the core structural base. It is crucial to keep it square and level from the beginning. Assemble it using these key actions:
Vertical posts support the elevated frame and set the loft height. They must be fastened securely and checked for plumb to prevent instability. Use the following steps:
Crossbars distribute weight and prevent structural sagging. This is especially important for wider beds or heavier loads. Reinforce the frame as follows:
The mattress base needs to support weight evenly and allow ventilation. The choice depends on your preference for flexibility or solidity. Prepare the base using one of these methods:
Guardrails are essential for loft bed safety, especially for children. They should be securely fixed and built to specific height and spacing standards. Ensure compliance by:
Safe access depends on ladder or stair stability and ergonomics. Choose a design that fits your space and user age, then build and install using these guidelines:
Anchoring the bed adds an extra layer of safety, especially in multi-use rooms, rentals, or homes with children. While optional, it significantly reduces movement and enhances stability. If you choose to anchor, follow these methods:
Finishing the bed not only improves appearance but also ensures safety by smoothing edges and sealing surfaces. Proper preparation and safe materials are especially important for children’s furniture. Complete the finish using the steps below:
Before allowing anyone to sleep or climb on the bed, conduct a thorough inspection to confirm everything is secure and hazard-free. Use this final checklist to validate build integrity:
Loft beds come in various practical designs, such as corner layouts, floating frames, elevated mezzanines, and built-in desk versions. Each loft bed variant is suited to different room sizes and functional needs. Choosing the right design maximises space, enhances aesthetics, and ensures stability. Below are four popular loft bed types, each offering specific benefits based on the room layout and intended use.
Positioned to make use of two adjacent walls, the corner loft bed is perfect for maximising awkward or underused corners in a room. By forming an L-shaped design, this variant offers enhanced stability and practical layout opportunities. Built-in shelving or a desk can easily be added to the interior angle, making it ideal for compact bedrooms where preserving central floor space is essential.
Instead of using ground posts, a floating loft bed is mounted directly onto wall studs using secure brackets, creating a sleek and open design underneath. This format is ideal for modern or minimalist interiors, especially where visual space is important. While it frees up the entire floor area below, it demands strong structural walls and precise anchoring, which may limit its feasibility in older buildings or rentals.
Offering the highest elevation of all the options, a mezzanine-style loft bed is designed to create a full usable zone beneath the sleeping area. This makes it suitable for taller rooms where a desk, seating area, or storage can occupy the space below. Its elevated design requires reinforced vertical supports, extended guardrails, and a securely mounted ladder to ensure safe and stable use.
For those needing a dedicated workspace within a limited footprint, the loft bed with a built-in desk integrates utility directly below the sleeping platform. A fixed or fold-down panel between the posts serves as a sturdy desktop, often enhanced with shelving or storage cubbies. This layout works especially well for students or remote workers and should include proper lighting and clearance to maintain comfort and productivity.
A loft bed with a slide adds a fun, playful feature, especially for children. The slide provides easy access from the elevated bed, making it perfect for younger kids. This design is ideal for combining comfort with entertainment, creating an engaging space. Safety features like guardrails and non-slip steps ensure a secure and enjoyable experience for children.
A loft bed must fit the room’s spatial limits, mattress dimensions, and structural needs to ensure safety and functionality. Each size factor, from height to frame width, affects how well the bed serves its purpose without compromising comfort or clearance.
The mattress must match the bed frame precisely to prevent shifting or unsafe gaps. Most DIY loft beds are built for twin or twin XL mattresses, which measure 39″x75″ and 39″x80″ respectively. To allow for easy placement, add at least 1/2″ of internal frame clearance on all sides. Support the mattress with evenly spaced slats or a solid plywood base to avoid sagging or uneven pressure points.
A safe and usable loft bed typically raises the mattress platform at least 8.2 feet (2.5 metres) off the floor. This height range creates usable space underneath while still allowing stable ladder access. Choose lower elevations for younger users and reserve taller builds for older children or adults, making sure to pair them with appropriate guardrails and reinforced ladders.
There must be 33″ to 36″ of space between the mattress top and the ceiling to allow safe headroom. In rooms with standard 8-foot ceilings, this generally limits the platform height to 66″ or less. Always measure ceiling-mounted fixtures, like fans or lighting, before finalising the build height to avoid contact risks.
The frame should extend 1″ beyond the mattress width and align posts with load-bearing zones for optimal support. For beds over 60″ wide, include a centre beam or wall anchoring to prevent mid-span sag. Keep posts square, evenly spaced, and firmly fixed at corners to maintain structural integrity throughout the bed’s lifespan.
A safe loft bed requires attention to four critical factors: proper wall anchoring, secure floor bracketing, correctly spaced guardrails, and matching the design to appropriate age and weight limits. Addressing each of these ensures the bed remains stable under daily use and minimises the risk of injury.
A loft bed should be anchored to wall studs to reduce wobble and prevent tipping. The most effective method is to use 3-inch lag bolts driven into at least two wall studs at both the head and foot sections. Identify the studs using a stud finder, and secure the frame using angle brackets where rails meet walls. Adding secondary L-brackets below the side rails increases lateral resistance.
Securing posts to the floor increases stability, especially in shared rooms or areas with high activity. Attach L-brackets on both sides of each post and screw directly into the subfloor. For non-permanent setups, rubber pads or wide cleats can help keep the bed from shifting without damaging the surface. Test for firm ground contact after installation.
Guardrails must be high enough and spaced closely enough to prevent falls. The top edge should rise at least 16 cm above the mattress, and vertical slats should be no more than 7 to 10 cm apart. This spacing prevents entrapment and meets child safety standards. Always smooth edges and check rail strength before use.
A loft bed must only be used by individuals within a safe weight and age range. Most DIY loft beds support up to 200-250 pounds and are not suitable for children under six years old. Before regular use, test the bed with actual body weight, and supervise children during access or play to avoid injuries.
To build a strong and safe loft bed, you must choose suitable wood types, finishes, and engineered panels based on where and how each material will be used. Focus on the species for framing, the purpose of plywood, and the safety of surface finishes.
Pine is best for posts, rails, and support frames due to its strength and low cost. Spruce works well for headboards, side rails, or parts that will be visible and painted. MDF should be limited to drawer faces or shelf panels as it lacks structural strength and may sag under weight.
Plywood is recommended for mattress bases and vertical panelling because it resists warping and handles weight better than MDF. Use a 3/4 inch AC-grade plywood for deck support or worktops, and avoid OSB or underlayment-grade sheets. Always drill pilot holes to prevent splitting at the edges.
Safe and effective finishes include water-based paint or stain with low-VOC and child-safe certification. Use paint when full coverage is needed and stain when you want to show wood grain. Apply a clear, non-toxic sealant to protect surfaces from moisture and wear, especially on guardrails and ladders.
To improve usability without increasing the footprint, a loft bed can include practical features like drawers, desks, stairs, and shelves. These additions help organise small rooms and add everyday convenience. The following options are commonly built into or under the loft bed frame.
Under-bed drawers make use of the space beneath the loft and help store clothes, toys, or bedding. Build drawer boxes from plywood or MDF and mount them on full-extension runners. Allow at least 10 to 12 inches of vertical clearance under the frame, and consider adding dividers or labels for organisation.
A built-in desk is ideal for study or remote work and fits easily between the posts below the bed. Use a 3/4 inch plywood or solid wood panel fixed at desk height, and add support cleats if spanning more than 36 inches. Include shelf brackets for extra storage and install a power strip or mounted task light for usability.
A stair unit with drawer steps adds both safe access and extra storage. Each step can function as a pull-out drawer or lift-up lid compartment. Use soft-close sliders for safety and reinforce the tread surface with corner brackets. Tread depth should be at least 10 inches to support safe climbing.
Floating shelves and tray-style nightstands offer compact surfaces for books, clocks, or small items. Mount them using L-brackets on the guardrail or wall-side posts. Keep them shallow and lightweight, and check that the mounting method does not obstruct climbing or movement in bed.
A loft bed must fit the room’s layout and conditions to be safe and practical. Before building, consider floor area, ceiling shape, and wall positions to determine where and how the bed can be installed. Below are four key scenarios where specific layout considerations apply.
Loft beds are especially useful in rooms under 100 square feet where vertical space must replace horizontal floor area. A raised bed opens room below for a desk, storage, or play zone. To maximise movement, choose compact furniture and place the ladder in a corner or along the shortest wall.
Rooms with angled or sloped ceilings, such as attic conversions, can still support a loft bed if clearance is planned carefully. Measure ceiling height at both ends of the bed and adjust post lengths accordingly. Use asymmetric rail heights or half-rails where the slope reduces headspace, and avoid placing the ladder beneath the low side.
Placing a loft bed in a room corner provides structural stability and conserves space. The headboard and one long side of the frame should align with solid walls. This leaves the open sides available for access and under-bed features. Always check that the placement does not block vents, outlets, or windows.
Recessed alcoves or closet-width spaces are ideal for a custom-fit loft bed. Trim the frame to match wall-to-wall dimensions with no more than 1/4 inch tolerance. Mount the frame directly to the wall studs on both sides and the back to create a built-in look. Optionally, add curtains or sliding panels for privacy.
Building a loft bed yourself can significantly reduce costs compared to buying a pre-made model. By managing materials, sourcing alternatives, and planning your expenses, you can keep your project within budget without sacrificing safety or function. Below are four ways to control costs.
DIY loft beds typically cost between £100 and £300 in materials, while store-bought versions can range from £700 to £1500. Doing it yourself saves on labour and allows full customisation of size and features. Keep in mind that DIY requires time, tools, and basic construction skills, and does not include warranty coverage.
Most builds include around £100 for lumber, £30 for fasteners and hardware, £20 to £50 for tools (if not already owned), and £20 for paint or stain. Plan for a 10% buffer to account for extra cuts, mistakes, or material defects. Optional upgrades like drawers, lighting, or desks may add £50 to £100, depending on quality.
If building a loft bed yourself feels impractical or too complex, hiring a professional is the safest and most efficient alternative. A professional builder can ensure accurate cuts, structural integrity, and proper installation of safety features like guardrails and anchors. This option eliminates the risk of errors and delivers a fully assembled, ready-to-use bed that fits your room layout and functional requirements.For those looking for a reliable loft bed provider, MK Furnishings offers professionally built high sleepers tailored to your child’s bedroom and lifestyle. From integrated desks and storage stairs to themed designs and custom dimensions, every loft bed is crafted with a focus on safety, space-saving design, and lasting durability. Contact MK Furnishings team to explore style options, receive personalised recommendations, and arrange for delivery and assembly anywhere in the UK.

Kyle Kane
Owner
Kyle Kane is Co-Owner of MK Furnishings, a family-run business based in UK that specializes in high-quality custom kids’ bunk beds, including triple, double, single, and themed designs. Since launching the company in 2016 alongside his brother-in-law, Kyle has helped deliver and assemble thousands of beds across the UK, Ireland, and beyond. Focused on customer satisfaction, Kyle leads a hardworking team that handles every step from ordering to delivery ensuring a smooth and professional service. His commitment to quality craftsmanship and reliable support has earned MK Furnishings a strong reputation and growing customer base throughout the region.
A bunk bed is dismantled by taking out the bedding and mattresses, removing guardrails, detaching the ladder, separating the top bunk, and unfastening the frame.
To assemble a double bunk bed, begin by organising all the parts, including the frame, support beams, slats, guardrails, and ladder. Place them on a
Fancy £50 off all orders! Enter in 50off to redeem in the coupon code section
